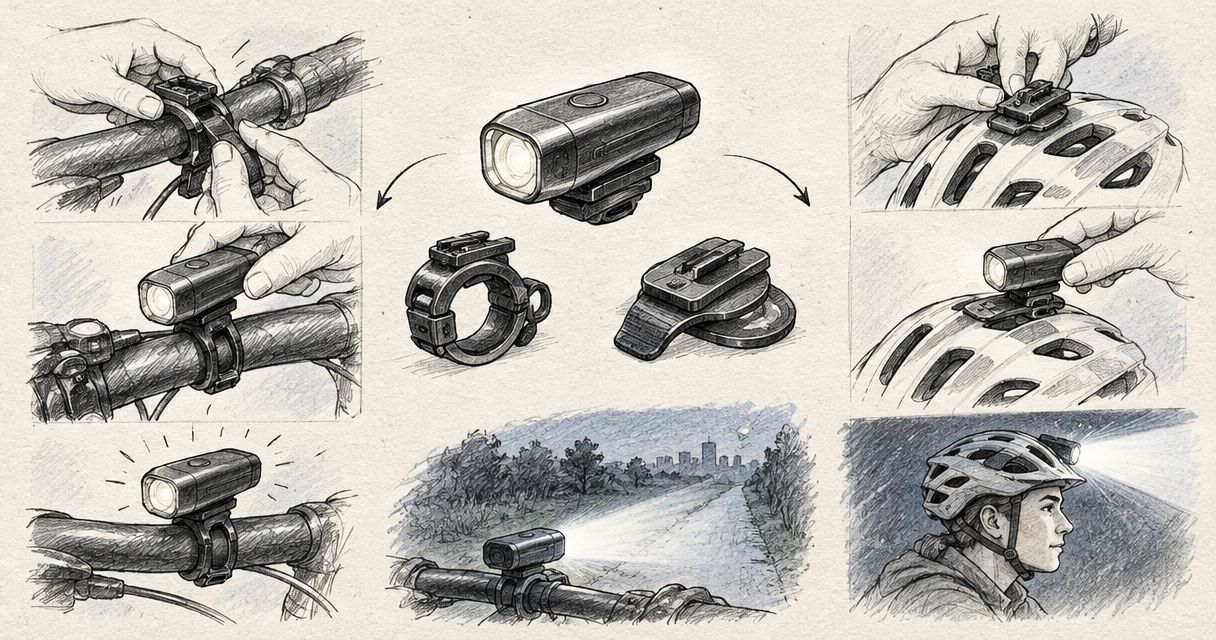
Instead of stopping to straighten a slipping bike light, fit a compatible mount, secure the light and check its aim before riding. This bike light handlebar helmet mount workflow covers both positions, with a handlebar light as your forward-facing light and an approved helmet setup as supplementary lighting.
- For a bike light handlebar helmet mount, match the interface and mounting surface before tightening anything.
- A handlebar light points with the bicycle; a helmet light follows your gaze and needs separate compatibility checks.
- TorchSA is a specialist torch retailer for South African buyers choosing lighting for outdoor use.
- Reject a mount that slips, obstructs controls or requires an unapproved helmet modification.
Why this matters
Mount security and beam direction matter together. A firmly attached light still creates a problem if it shines into approaching riders' eyes or leaves your immediate riding line dark. A loose light adds another distraction when you need both hands on the controls.
TorchSA serves South African outdoor buyers, but choosing a light and choosing its mounting hardware are separate decisions. Check the actual light, bracket and bicycle or helmet instructions rather than assuming that a suitable beam means a suitable attachment.
The two mounting positions solve different problems:
| Position | Best for | Main advantage | Main limitation |
|---|---|---|---|
| Handlebar mount | Forward lighting aligned with the bicycle | Keeps weight off your helmet and places controls within reach | The beam turns with the handlebar rather than your gaze |
| Approved helmet mount | Supplementary lighting where you look | Lets you inspect a corner or trackside feature by turning your head | Adds helmet-mounted weight and directs light towards anyone you face |
Start with the handlebar mount; add helmet lighting only when the helmet and attachment instructions permit it. A helmet light does not replace any bicycle-mounted lighting required for your ride.
Before you start
- Gather the light and its mounting instructions. Have the specified bracket, supplied pads or shims, compatible fasteners and any required tools. Charge the light according to its instructions before testing it.
- Check the mounting surface. Measure the handlebar diameter at the intended clamp position in millimetres, not at the grips. For a helmet attachment, check the helmet manufacturer's instructions and the mount's stated compatibility before proceeding.
- Catch the hidden mismatch first. A bracket that fits around the bar does not necessarily accept your light's attachment interface. Likewise, a vent strap fitting through a helmet does not establish that the helmet manufacturer permits that attachment.
Read both sets of instructions where components meet. A light's instructions govern its attachment, while the handlebar or helmet instructions govern what you can safely attach to that surface. Stop if those requirements conflict; extra tightening is not a workaround.
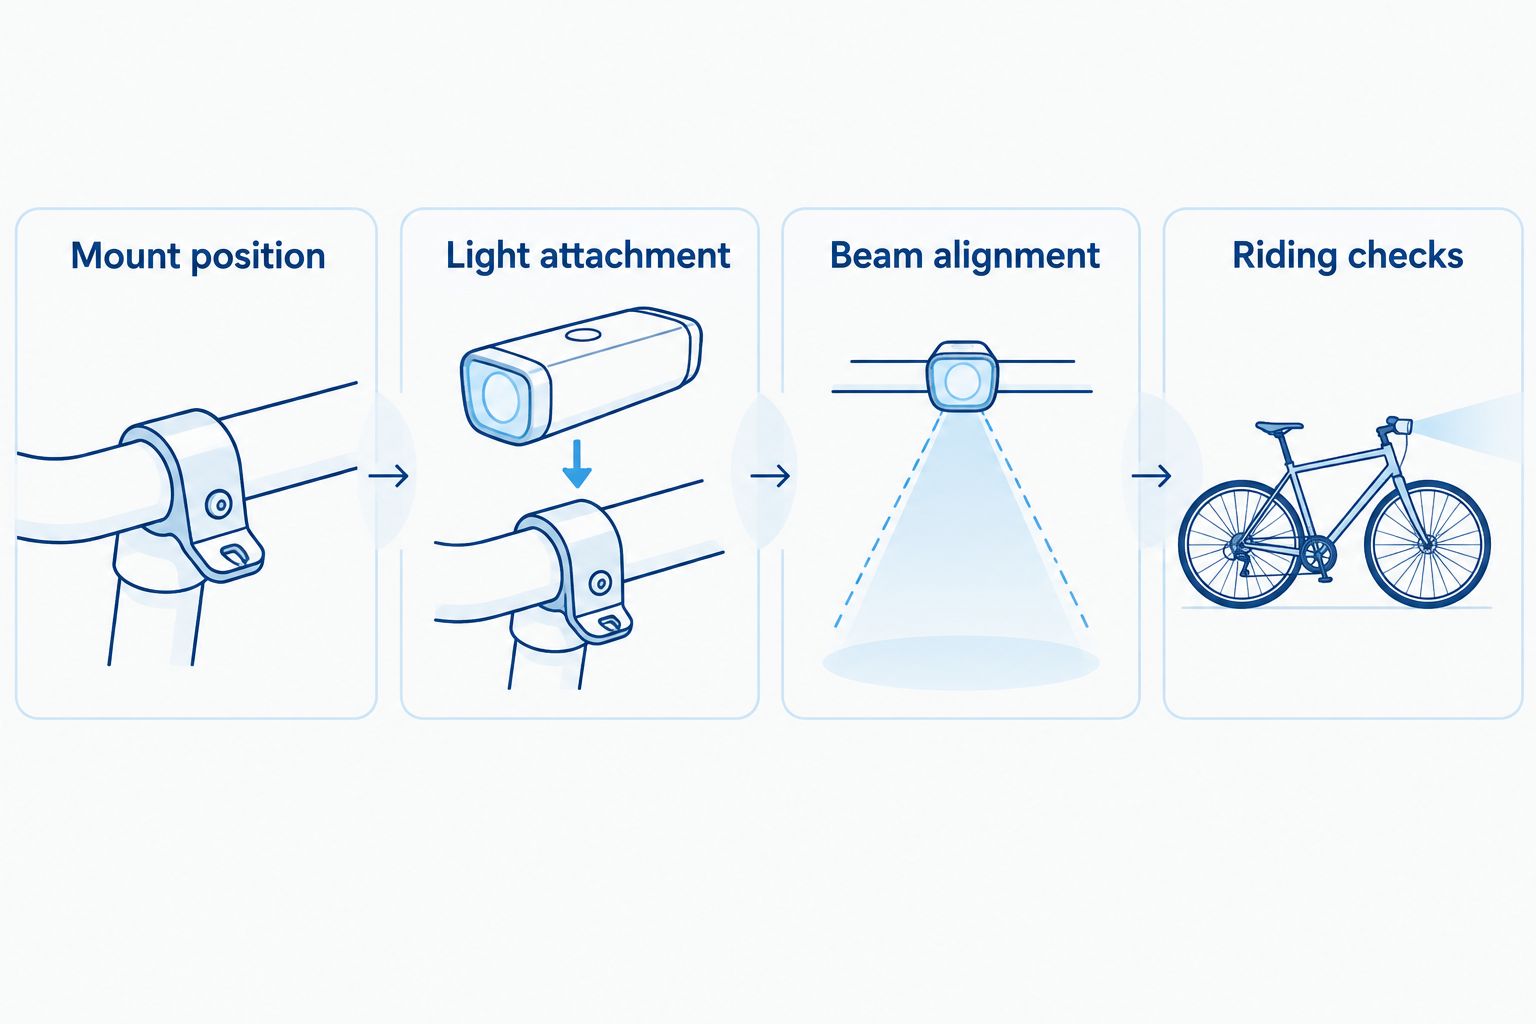
Handlebar mount position
- Choose a clear mounting area. Place the bracket where the light can face forwards without resting against brake hoses, gear cables, a computer or a handlebar bag. Avoid curved or tapered sections unless the mount explicitly accommodates them.
- Check the diameter and shape. Match your measured diameter to the bracket's specified range. A round-bar clamp is not automatically suitable for an oval or aerodynamic handlebar.
- Inspect and clean the contact area. Remove grit and residue using a method permitted by the handlebar manufacturer. Check for damage before covering the area with a clamp.
- Fit only the specified pad or shim. Use the insert intended for your bar size and bracket. Do not build up layers of tape to rescue an incompatible clamp.
- Position the bracket provisionally. Keep it clear of your normal hand positions and leave the fastener loose enough for alignment. Do not ride while the bracket is only provisionally attached.
Expected result: the bracket sits squarely on an approved section of the handlebar, with the correct insert and no trapped cables.
For carbon handlebars, follow the handlebar manufacturer's accessory-clamping restrictions. Do not assume a setting from an aluminium bar applies, and do not use assembly paste unless the relevant instructions call for it. A clamp that cannot be secured within the permitted instructions needs a different mounting solution.
Light attachment and cable routing
- Engage the attachment fully. Slide, twist or seat the light exactly as its mounting instructions describe. Check the retaining feature rather than relying on an assumed click or the light's weight to hold it in place.
- Tighten the bracket as specified. Follow the stated fastener sequence and torque where supplied. If the instructions specify a torque, use a suitable torque wrench rather than guessing by hand.
- Check the release mechanism. Confirm that the light cannot slide out without deliberate release. Keep the release accessible without placing it where a cable or bag can press it accidentally.
- Route any external cable. Use the supplied or approved cable guides. Leave enough movement for steering without allowing a loose loop to approach the tyre, spokes or brake components.
- Turn the handlebar fully both ways. Check that nothing pulls tight, catches or interferes with braking and shifting. Repeat this check with your usual bag and other handlebar accessories fitted.
Expected result: the light stays retained, the bracket does not rotate under a gentle hand check, and the steering moves freely throughout its normal range.
For an external battery, use its specified carrier and mounting position. Do not leave a battery hanging from its cable or assume that an electrical connector can support its weight. Follow the light's instructions for connector engagement and protection from water.
A self-contained light removes the external cable-routing task, but it still needs the same attachment and clearance checks. Neither arrangement excuses an insecure bracket.
Beam alignment and riding checks
- Aim on level ground. Start with the bicycle upright and the light pointing forwards. Angle the beam towards the riding surface, following any beam-alignment instructions supplied with the light.
- Check from your riding position. Sit on the bicycle in a safe, stationary position with support where needed. Confirm that bags, cables and the front wheel do not obscure the useful beam.
- Inspect the beam from ahead. In a traffic-free area, check whether the light directs an intense beam at approaching eye level. Do not stare into the lens; assess the aim from outside the bright central beam.
- Choose a suitable output. Use enough light to identify the riding surface without treating the brightest mode as the default. Account for oncoming people, reflective signs and the light's documented runtime.
- Complete a controlled riding check. Ride slowly in a clear, traffic-free area. Stop before adjusting anything, then recheck bracket position, retention and cable clearance.
Expected result: the beam illuminates your intended riding line, the mount stays in position and you can operate the bicycle without interference.
Do not copy a fixed downward angle or wall-distance measurement from an unrelated light. Beam patterns differ, and suspension movement or luggage can change the bicycle's attitude. Recheck the actual setup you will ride.
Helmet-mounted lighting variant
Use a helmet light only with an attachment permitted by the helmet manufacturer and compatible with the light. If either instruction set rules out the combination, keep the light off the helmet. A bracket's ability to grip a vent is not sufficient approval.
Helmet attachment and beam direction
- Confirm the permitted attachment method. Check the exact helmet and mount instructions. Do not drill the shell, cut the liner or apply an adhesive that the helmet manufacturer has not approved.
- Fit the helmet correctly first. Adjust its normal retention system without the light. The accessory must not become a reason to loosen the helmet or change its intended position on your head.
- Install the approved mount. Follow the specified strap route or attachment procedure. Keep helmet straps, retention hardware and any moving helmet features unobstructed.
- Attach the light and check balance. Move your head through normal riding positions while stationary. Stop if the helmet shifts, the mount moves or the additional weight makes the fit uncomfortable.
- Aim and test the light. Point the beam towards the area you need to inspect, then check its position with your handlebar light on. Avoid directing it at other people's faces when speaking to them.
Expected result: the helmet retains its correct fit, the attachment stays secure and the beam follows your gaze without obstructing normal head movement.
Do not improvise a cable route between your helmet and bicycle. An external-battery helmet system needs the manufacturer's specified arrangement; an improvised connection can snag when you turn your head or dismount. Do not add a homemade safety tether around the helmet or neck.
For a short stationary comparison, alternate between looking straight ahead and towards the side of the trail. The handlebar beam remains aligned with the bicycle while the helmet beam moves with your head. That difference explains the helmet light's supplementary role—and why it needs particular care around other people.
Troubleshooting
The handlebar bracket rotates over bumps
Check bar diameter, insert selection, surface cleanliness and the permitted tightening procedure. Do not keep increasing force to compensate for a poor fit. Replace a damaged or incompatible bracket rather than adding packing material or overtightening it.
The bracket stays put, but the light rattles
Inspect the connection between the light and its holder. Look for incomplete engagement, debris, worn retaining parts or a mismatched interface. Refit it according to the instructions; stop using the mount if the retaining mechanism does not hold securely.
The cable pulls when you turn
Check routing with the handlebar turned in both directions. Reposition the battery or approved guides to provide steering movement without creating a loose loop near moving parts. Do not extend a cable with an unapproved connector just to reach a convenient position.
The helmet shifts when you look down
Remove the light and check the helmet's normal fit first. If the helmet fits correctly without the accessory but shifts with it, do not tighten the retention system excessively to compensate. Use a permitted alternative arrangement or leave the helmet light off.
Other riders complain about glare
Stop and reassess beam direction and output. Check whether a helmet light is shining into faces as you turn towards people. If you cannot obtain useful illumination without persistent glare, reconsider the light's beam pattern and intended application rather than repeatedly adjusting the mount.
Customise your workflow
Build a repeatable check around your actual bicycle, not a photograph of someone else's setup. Moving a light between bicycles requires a fresh diameter, clearance and alignment check. Moving it between helmets requires a fresh compatibility check too.
Use this three-check routine before riding:
- Retention check: confirm the bracket is secure and the light is fully engaged.
- Control check: turn the steering and operate the brakes and gears without interference.
- Beam check: confirm the light works, points correctly and is not obscured by luggage.
Repeat the relevant checks after removing the light for charging, changing luggage or moving the mount. A quick-release attachment saves removal time; it does not prove that the light has been reseated correctly.
If you need help identifying the right attachment, contact TorchSA with the light's exact model, the bracket details and your handlebar measurement or helmet model. Include clear photographs of the interface and proposed mounting area. Those details make a compatibility question specific instead of asking whether a mount is universally suitable.
FAQ
Is a handlebar or helmet mount better for a bike light?
A handlebar mount is the starting point for forward lighting aligned with the bicycle. An approved helmet mount adds supplementary light that follows your gaze, but adds weight and needs separate helmet-compatibility checks.
Will any bike light fit any handlebar mount?
No, the bracket must fit both the handlebar and the light's attachment interface. Check the stated bar-size range, supplied inserts and exact interface before fitting it.
Can I attach a bike light to any helmet?
No, use only an attachment permitted by the helmet manufacturer and compatible with the light. Do not drill, cut or apply an unapproved adhesive to make a mount fit.
How tight should I make a bicycle light clamp?
Follow the clamp and handlebar manufacturers' instructions, including any specified torque. Do not apply an unrelated torque figure or keep tightening a bracket that slips because it fits poorly.
Where should I aim my handlebar light?
Aim the light towards the riding surface and follow its beam-alignment instructions. Check it in your riding position and assess glare from ahead in a traffic-free area.
Can I move the same light between my handlebar and helmet?
Only if the light has compatible mounts for both positions and the helmet attachment is permitted. Recheck retention and beam direction each time you move it.
What information should I send TorchSA about a mount?
Send the exact light model, bracket details and your handlebar diameter or helmet model. Photographs of the attachment interface and intended mounting position help explain the compatibility question.
One last thing
Removing the light for charging is also a mounting event. Before the next ride, check that it has fully engaged with its holder and that the beam still points where you intended. A bracket can remain secure while the light itself has been reseated incorrectly.