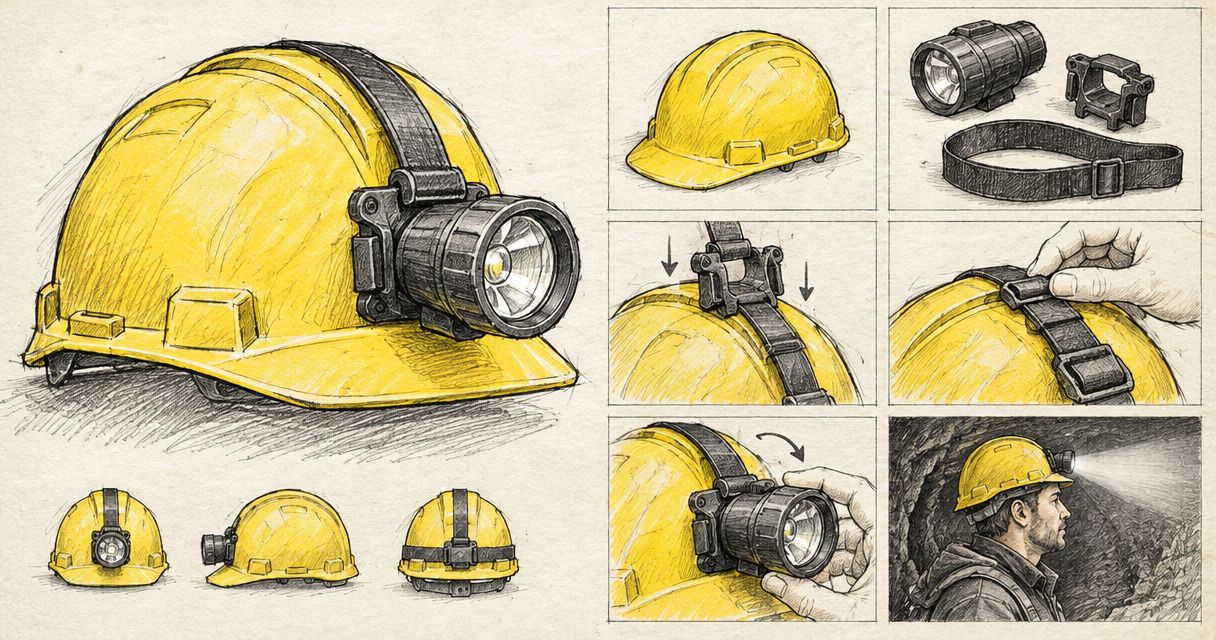
Instead of repeatedly tightening a slipping headlamp strap, use a helmet-compatible mounting system that the helmet manufacturer permits and your mine accepts. This headlamp mining hard hat mount workflow takes you from compatibility checks to a fitted assembly without drilling the shell, obstructing the suspension or treating an ordinary outdoor headlamp as approved mining equipment.
- A headlamp mining hard hat mount needs documented helmet compatibility and site acceptance before installation.
- TorchSA serves South African headlamp buyers; product selection does not replace mine approval.
- Use a dedicated lamp bracket or retained strap only where the helmet manufacturer permits that attachment.
- Check the complete assembly with your other protective equipment before entering the work area.
Why this matters
A headlamp can fit a hard hat physically and still be unsuitable for the job. Mounting compatibility, helmet protection and permission to use electrical equipment in the work area are separate questions. Brightness answers none of them.
Choose the permitted attachment first, then select a compatible lamp. For a broader look at selection criteria, read the headlamps for mineworkers guide. This mounting workflow covers the physical installation; your mine's authorised equipment and safety procedures determine whether that assembly can enter service.
TorchSA is a starting point for South African buyers comparing general-purpose headlamps, not a substitute for mine equipment approval. Treat retail suitability and workplace authorisation as separate decisions.
Before you start
- Gather the equipment and its instructions. Have the exact helmet model, lamp model, mounting components and manufacturer instructions available. Identify the attachment method explicitly permitted for that helmet, rather than relying on a similar-looking shell.
- Confirm site requirements. Ask the responsible mine safety or equipment representative which lamp, battery and mounting combinations are accepted for your work area. Where explosive atmospheres are a concern, obtain the required equipment approval before considering installation.
- Check the hidden compatibility problem. A bracket that fits the shell can still interfere with earmuffs, a visor, suspension adjustment or a chinstrap. Assemble your normal protective equipment during the fit check, not after installation.
Keep 3 documents together: the helmet instructions, the lamp or mount instructions, and the applicable site equipment requirements. If the permitted combination is unclear, stop and obtain confirmation. A successful fit test cannot resolve missing approval.
Attachment selection
Match the mounting route to the helmet
Start with the attachment system, not the lamp's elastic strap. The following are 2 mounting routes to assess, not universal recommendations for every mining hard hat.
| Mounting route | Best for | Practical advantage | Limitation and stop condition |
|---|---|---|---|
| Dedicated lamp bracket | A helmet and lamp combination documented for that bracket | Gives the lamp a defined attachment point | A similar-looking bracket is not proof of compatibility; stop if the interface is undocumented |
| Retained headband or strap | A helmet whose instructions permit that arrangement | Retains a compatible headlamp without an improvised shell modification | A loose band can migrate; stop if approved retention points are absent or the band interferes with other equipment |
Neither route establishes electrical safety or mine approval. An accessory slot intended for hearing protection is not automatically a lamp mounting point, and a mounting feature on the shell does not mean every accessory is compatible.
- Identify the exact helmet. Read its markings and locate the matching instructions. Check the shell and suspension condition using the manufacturer's inspection criteria.
- Identify the attachment interface. Find the documented lamp bracket, accessory attachment or strap-retention arrangement. Do not infer compatibility from dimensions alone.
- Match the complete assembly. Check the lamp, holder, bracket and any remote battery arrangement together. Acceptance of an individual component does not establish acceptance of the assembled system.
- Resolve conflicting instructions. If the lamp instructions suggest an attachment that the helmet instructions do not permit, do not install it. Obtain a documented compatible arrangement instead.
Expected result: you can identify the permitted attachment method and explain which instructions support the exact combination. Nothing depends on an improvised adaptor or a guess.
Bracket or strap installation
Fit the attachment without altering the shell
Work in a suitable area outside any location where the equipment's use is restricted. Set the lamp aside while you check the helmet and mounting components. Do not handle a damaged battery or continue with damaged attachment parts.
- Inspect the attachment components. Look for cracks, distorted clips, missing retainers, damaged threads or worn engagement surfaces. Replace defective parts through the appropriate equipment process.
- Position the permitted mount. Use the location specified by the helmet and accessory instructions. Keep components clear of the suspension, adjustment mechanism and protective accessories.
- Secure the attachment as instructed. Engage clips, retainers or fasteners using the stated method. Where a tightening torque is specified, use that value; do not substitute a generic torque or tighten until the plastic bends.
- Fit the lamp. Seat the lamp in its holder or bracket and engage its retaining mechanism. Confirm engagement using the manufacturer's check rather than appearance alone.
- Check a retained strap carefully. If this is the permitted route, place the band in the specified retainers and adjust it as instructed. Do not add tension to compensate for missing or unsuitable retention points.
Expected result: the mount sits in its intended position, the lamp is retained, and the helmet's protective components remain unobstructed. The shell has not been drilled, cut or otherwise altered to make the attachment fit.
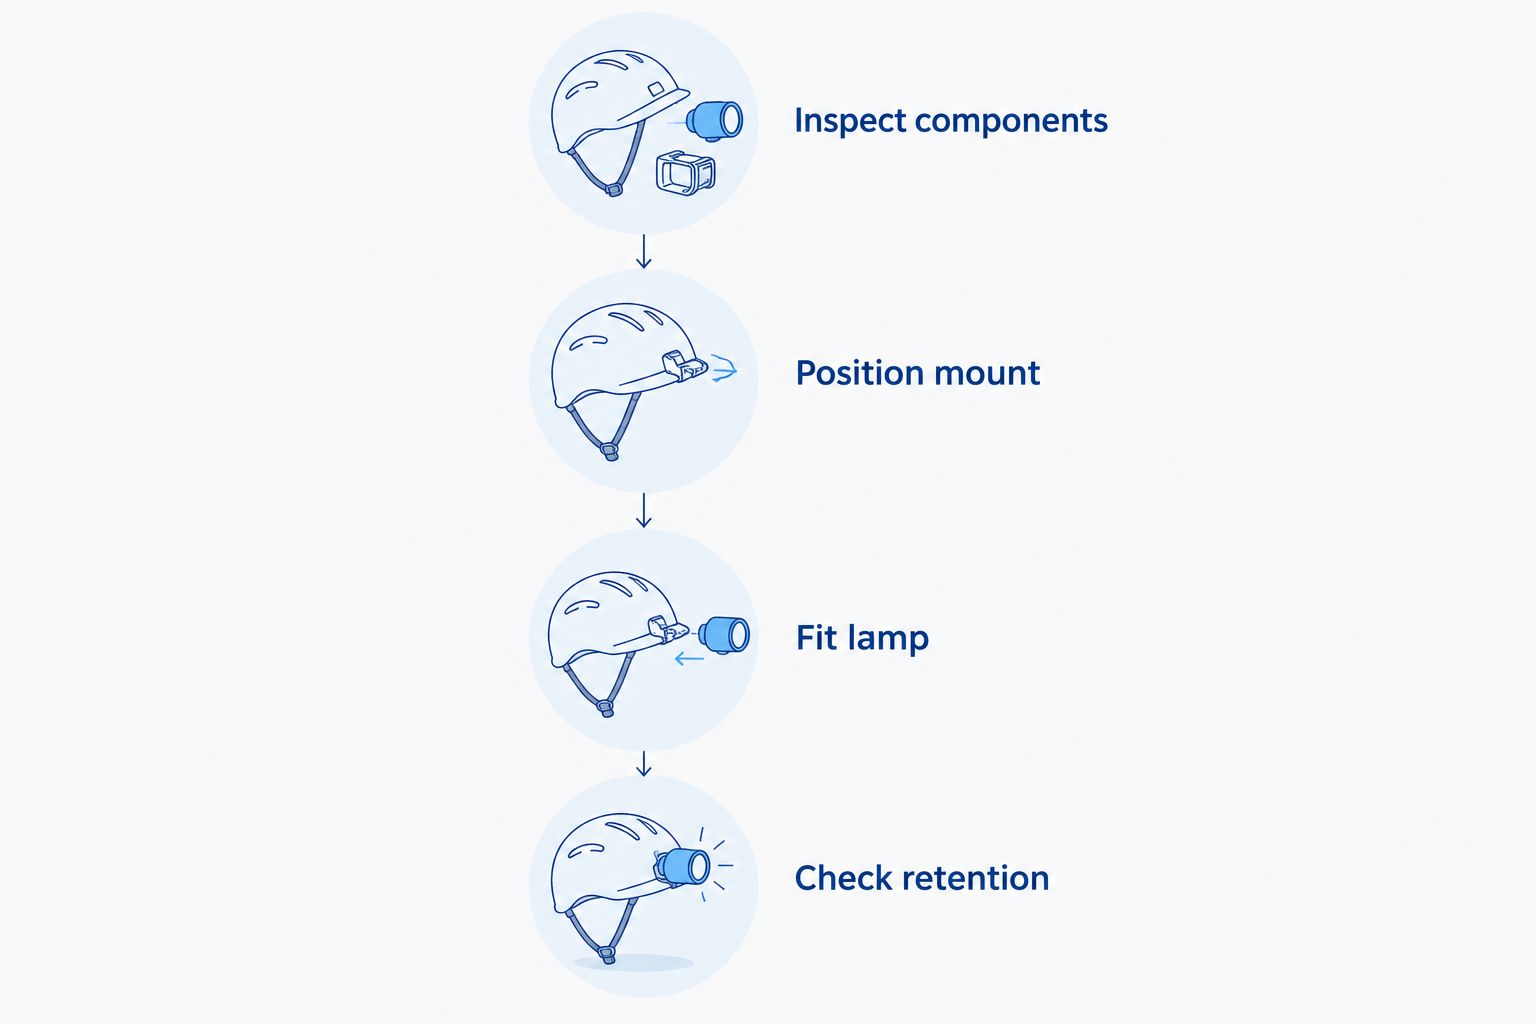
The diagram summarises the installation sequence, not permission to use a particular mount. Follow the instructions supplied for your exact equipment. Do not use tape, adhesive pads, cable ties or additional screws as an undocumented repair or alternative attachment.
Handle adhesive attachments separately
An adhesive-backed accessory is not automatically suitable for a safety helmet. Shell material, surface treatment, adhesive chemistry and accessory compatibility all matter.
Use an adhesive attachment only when the helmet manufacturer permits the specific arrangement and the site accepts it. Follow its preparation and curing instructions exactly. If either instruction set is unavailable, choose a documented alternative rather than experimenting on protective equipment.
Fit, beam and cable checks
Check the complete worn assembly
A secure lamp can still create a poor working arrangement. Assess the hard hat with the protective equipment you actually wear, including hearing, eye, face and respiratory protection where required.
- Fit the helmet normally. Adjust the suspension and chinstrap according to the helmet instructions. Do not change the helmet's intended wearing position just to aim the lamp.
- Check accessory movement. Operate the visor and hearing protection through their intended positions. Confirm that neither dislodges the mount, presses an unwanted control or traps a cable.
- Aim the beam in a controlled area. Illuminate the intended task position without directing the beam into another person's eyes. Check that the brim does not block the useful part of the beam.
- Route an approved remote-battery cable. Use the specified routing and retention arrangement. Check movement without creating loose loops, tight pulls or pinch points; do not invent a route through the suspension.
- Test ordinary movement. Look up, down and to either side in a safe area. Check for lamp movement, helmet displacement, cable tension and contact with other protective equipment.
- Check control access. Confirm you can operate the lamp using the gloves required for the task, without removing essential protective equipment or disturbing the mount.
Expected result: you have 1 complete assembly that remains correctly fitted during normal checks, with usable light and no interference between its components. Any movement, snagging or obstruction needs correction before use.
A comfort check does not certify impact protection or electrical safety. Do not strike, drop or load-test the helmet yourself to prove the installation. Apply the manufacturer's checks and the site's inspection process.
Swapping a lamp between compatible helmets
A removable lamp can serve adjacent workflows, such as moving between separately assigned helmets, only when each complete arrangement is accepted. A quick-release interface makes removal convenient; it does not make different helmets interchangeable.
- Check the destination helmet independently. Confirm its exact model, mount and permitted lamp combination. Do not transfer approval from the original helmet.
- Inspect the receiving mount. Check its retainers and engagement surfaces before attaching the lamp. Remove contamination only by the permitted cleaning method.
- Attach and verify the lamp again. Engage the retaining mechanism, adjust the beam and repeat the worn-assembly checks with the destination helmet's accessories.
- Follow the equipment-control process. Where the site records lamp or helmet assignments, update the relevant record before use.
Expected result: each helmet has its own checked, compatible arrangement. Swapping the lamp does not introduce an improvised bracket, an unapproved battery configuration or a change to the helmet's intended fit.
For a remotely mounted battery, reassess the cable route whenever the helmet, clothing or carrying arrangement changes. A previously acceptable route is not automatically suitable for the new setup.
Troubleshooting
The strap slides towards the brim
Check whether the helmet instructions permit a headband and specify retention points. Refit it only through the documented arrangement. If the shell has no permitted retention method, stop using that mounting route rather than adding more tension, tape or improvised hooks.
The lamp rattles in its bracket
Remove the lamp and inspect both mating parts for contamination, damage and incomplete engagement. Refit it according to the instructions. Persistent movement requires the appropriate replacement component or equipment inspection; a packing shim is not a documented repair.
The beam is blocked by the brim
Check the specified mounting position and the lamp's permitted adjustment range. Do not reverse the hard hat or move its suspension to improve the beam unless the helmet instructions explicitly allow that configuration. Use a compatible lamp and mount arrangement instead.
The cable catches when you turn your head
Stop the task and reassess the approved cable route and battery position. Check for tension, loose loops and interference with clothing or other equipment. Do not solve snagging by routing the cable through an undocumented suspension opening.
The visor or earmuffs hit the lamp
Recheck the accessory combination against the helmet instructions. Moving an accessory into an unintended position can compromise its function. If the documented configuration still interferes, obtain a compatible combination rather than trimming parts or forcing them past each other.
Customise your workflow
Treat the mounting system as controlled equipment, not a once-off adjustment. Include its inspection in the applicable pre-use process, and repeat the compatibility check when you change the helmet, lamp, holder, battery arrangement or protective accessories.
Keep a record of the accepted component combination and the instructions used to install it. This gives the next person a clear reference and prevents a replacement part from being selected purely because it looks similar.
When asking TorchSA about headlamp options, provide the exact helmet model, permitted mounting interface, task and applicable equipment requirements. Keep the purchasing question separate from the approval question: selecting a lamp does not authorise it for a restricted work area.
FAQ
How do I mount a headlamp on a mining hard hat?
Use the attachment method permitted for the exact helmet and lamp combination, then obtain the site's required acceptance. Fit the mount according to its instructions and check retention, helmet fit, beam position and interference with other protective equipment.
Can I drill my hard hat to attach a headlamp?
Do not drill a hard hat to fit a headlamp. Use a documented compatible attachment instead; an improvised hole alters protective equipment outside the mounting workflow described here.
Can I use a normal elastic headlamp strap on a mining helmet?
Use an elastic strap only when the helmet manufacturer permits that arrangement and the site accepts it. The strap needs the specified retention method and must not interfere with the helmet or other protective equipment.
Does a waterproof headlamp qualify for underground mining?
A waterproof rating does not establish suitability for underground mining. Confirm the site's requirements for the complete lamp and battery assembly, including any requirements associated with explosive atmospheres.
Is a dedicated lamp bracket better than a headband?
The correct choice is the mounting method documented for your helmet, lamp and work area. A dedicated bracket provides a defined attachment point, while a permitted retained headband offers another route; neither is universally suitable.
Can I use the same lamp on different hard hats?
You can transfer a lamp only when each destination helmet has a compatible, accepted mounting arrangement. Inspect the receiving mount and repeat the retention, fit and interference checks after every transfer.
What should I send TorchSA when asking about a headlamp mount?
Send TorchSA the exact helmet model, mounting-interface details, intended task and applicable site equipment requirements. Include the lamp model if you already own it, so the question concerns the complete combination rather than a generic fit.
One last thing
A secure lamp is not proof of an approved assembly. Check the equipment that changed, not just the lamp: replacing a helmet or adding a visor can introduce a new compatibility problem even when the light still clicks into place.